The Micro:bit's temperature sensor does not tell me anything I do not already know - every smart home device has a temperature sensor. A CO2 sensor on the other hand gives me something new and valuable - a window into the indoor air quality.
Sensing the air around you
The Sensirion SCD40 sensor is capable of measuring Carbon Dioxide (CO2) concentrations in the air, in the range between 400 and 2000 ppm. Knowing the concentration level in your home is valuable information as Carbon Dioxide is a key indicator for indoor air quality. A high concentration in the air can reduce your well-being and cognitive performance.
The SCD40 is compatible with indoor air quality measuring standards and can be used to continuously monitor the air quality in a room. You can manually check the sensor reading or you can feed the measurement into a home automation system like Home Assistant. A home automation system can notify the people in the room or automatically increase the ventilation when the concentration level gets too high.
Devices that measure air quality are available on the consumer market. Most of them include more capabilities than just measuring Carbon Dioxide and often come with a display. This adds to the cost of the device, making it infeasible to add them to every room in the house. The capability of the device I am building is definitely inferior to commercial products, but it is more than enough to get an indication of the air quality in the room.
Wiring up the sensor
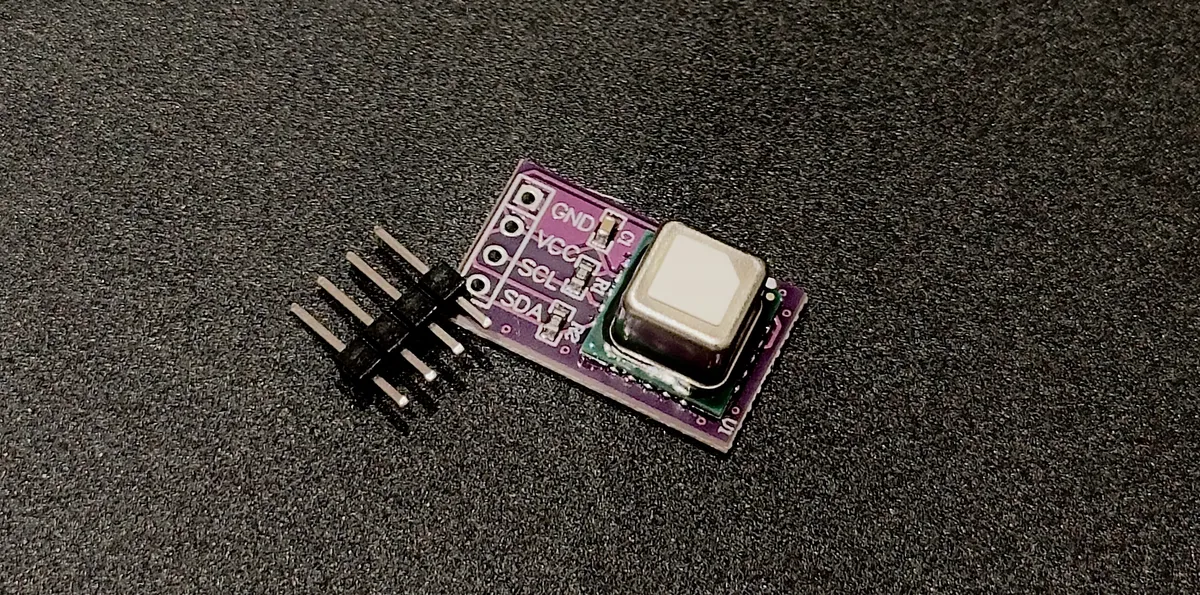
Hand-soldering the sensor is not practical as it comes in an LGA package, so I bought a sensor that was pre-soldered on a breakout board. Soldering was therefore limited to only adding four pins to the breakout board to make it possible to connect on a breadboard.
The sensor communicates using the I2C protocol and this requires four wires to be connected. The GPIO board that the Micro:bit is mounted on has labels showing the four I2C bus pins. Wiring up the sensor is just a matter of connecting the pins on the GPIO board with the identically labeled pins on the sensor breakout board.
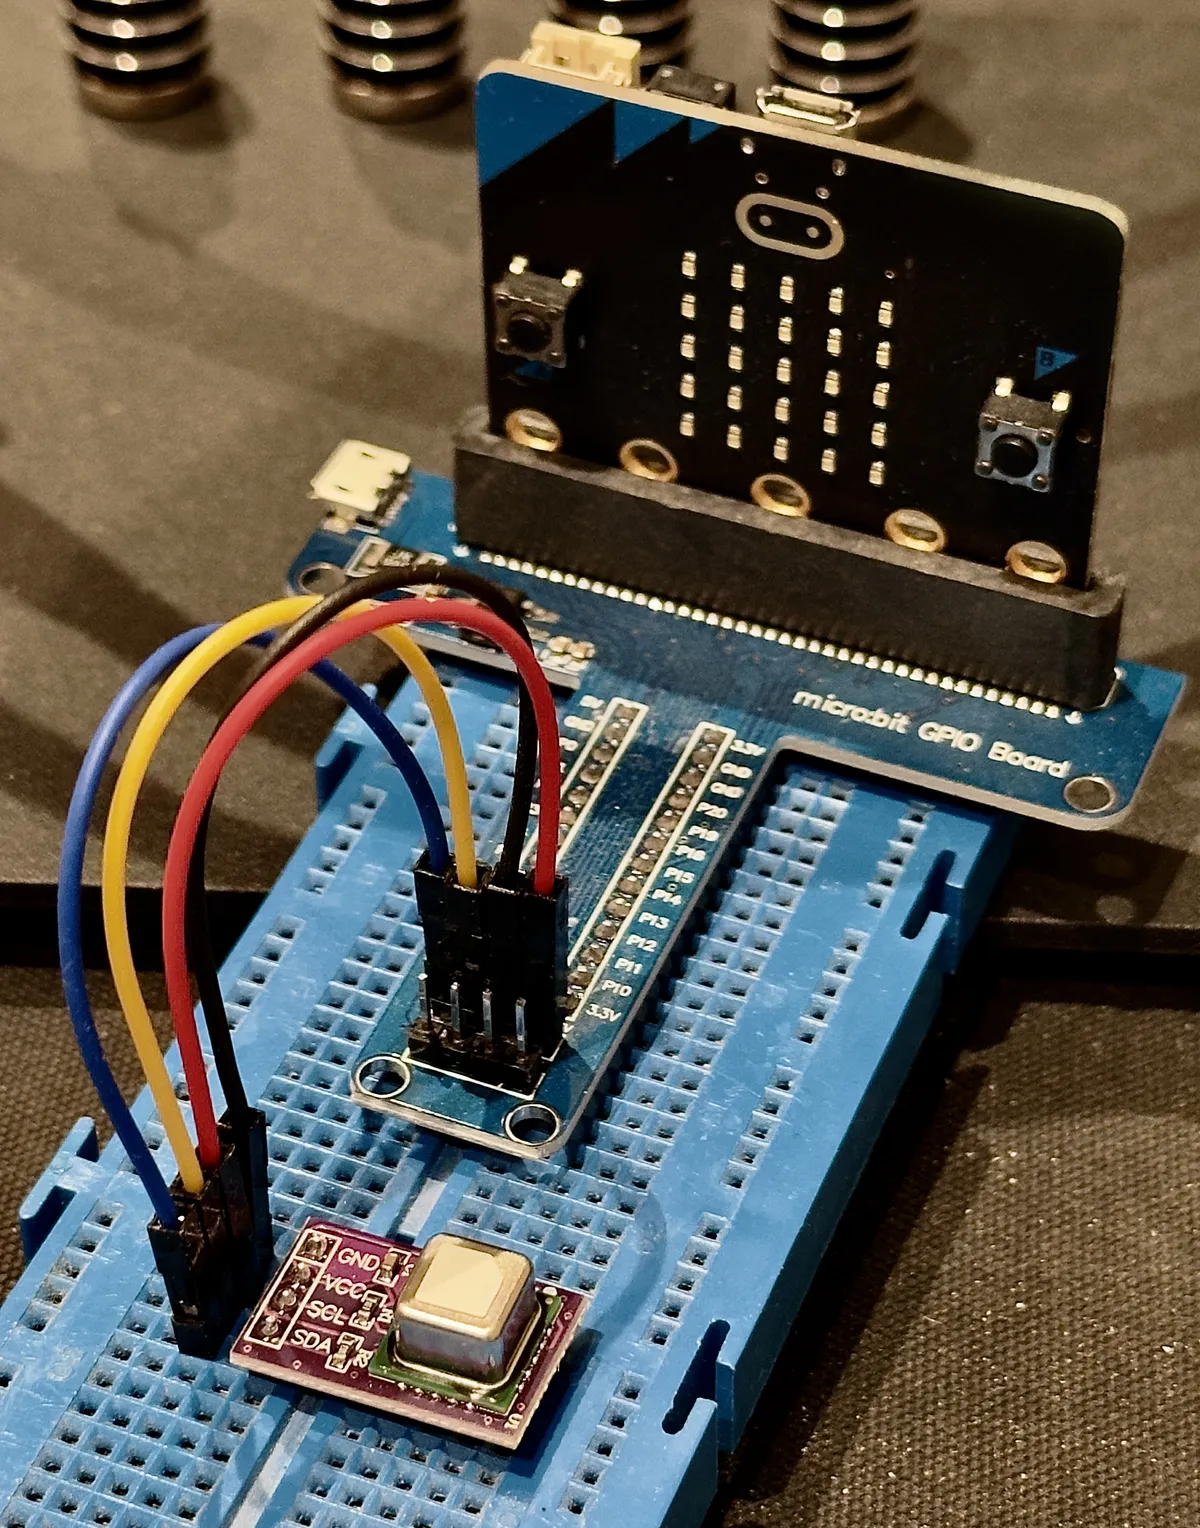
The board uses different pins for the internal I2C bus, connected to the
onboard peripherals, and the external I2C bus that the SCD40 is connected to.
We can find the exact microprocessor pins the sensor is connected to by looking
at the Micro:bit schematic. On the page showing the Target MCU we find the
labels I2C_EXT_SCL and I2C_EXT_SDA telling us that the sensor's data pins
are connected to pin P0.26 and pin P1.00.
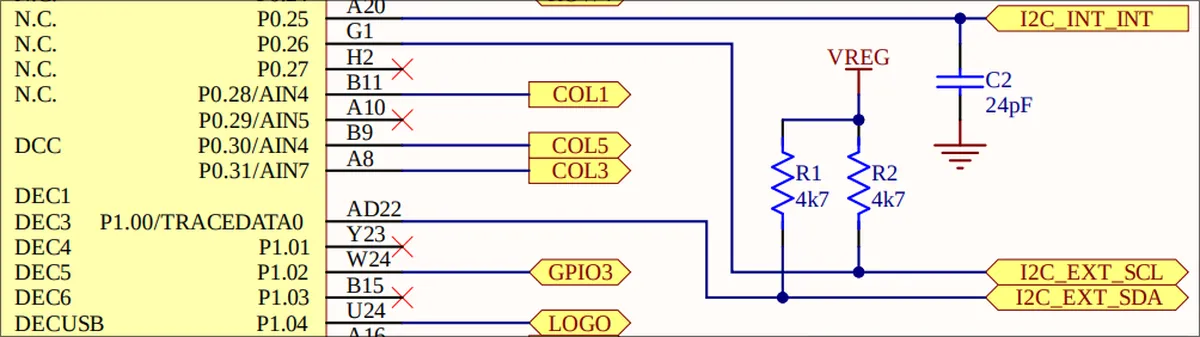
We need this information when we configure the communication bus in the software.
Software
The software leverages the crates of the Embassy project and its async-await
execution engine. The entrypoint of our system is the main function and it is
a normal function that is preceded by the embassy_executor::main macro. The
function takes a single Spawner argument and we use it to spawn our
asynchronous tasks. In the main function we initialize the embassy_nrf HAL
and the I2C bus. Then we spawn our async tasks, and besides that there is
nothing more we need to do to set up the async-await execution engine.
To communicate with an I2C device from the nRF52833 microcontroller we can use the Two-Wire Interface Master (TWIM) feature. This handles the sending and receiving of bits on the wire. We initialize the TWIM with the pins for the external I2C bus on the Micro:bit.
#[embassy_executor::main]
async fn main(spawner: Spawner) {
static I2C_BUS: StaticCell<Mutex<ThreadModeRawMutex, Twim>> = StaticCell::new();
info!("Starting...");
let p = embassy_nrf::init(Default::default());
// Initialize I2C bus
let tx_ram_buffer = TX_RAM_BUFFER.init([0; BUFFER_SIZE]);
let config = twim::Config::default();
let i2c = Twim::new(p.TWISPI0, Irqs, p.P1_00, p.P0_26, config, tx_ram_buffer);
let i2c_bus = Mutex::<ThreadModeRawMutex, _>::new(i2c);
let i2c_bus = I2C_BUS.init(i2c_bus);
spawner.spawn(co2_task(i2c_bus)).unwrap();
let temp = Temp::new(p.TEMP, Irqs);
spawner.spawn(temp_task(temp)).unwrap();
}I want to run two different tasks, one reading the temperature of the nRF-chip, and another reading the CO2 sensor. The latter is the more interesting of the two so I am only going to discuss this task in detail.
Diving into the details
An asynchronous task in Embassy is defined as a function preceded by the
embassy_executor::task macro. The details of the co2_task are listed in the
snippet below and the task starts by initializing the device and reading the
sensor's serial number. We use this to verify the presence of the sensor and we
run a self test to verify its functionality. At this stage we do not worry
about sensor calibration so we go ahead and instruct it to start periodically
taking measurements.
#[embassy_executor::task]
async fn co2_task(bus: &'static Mutex<ThreadModeRawMutex, Twim<'static>>) {
const INTERVAL_MS: u32 = 5000;
let i2c_dev = I2cDevice::new(bus);
let mut sensor = Scd4xAsync::new(i2c_dev, Delay);
loop {
let id = sensor.serial_number().await;
match id {
Err(_) => {
info!("Waiting for CO2 sensor");
Delay.delay_ms(2000u32).await;
continue;
}
Ok(id) => {
info!("CO2 sensor serial number: {:#02X}", id);
break;
}
}
}
if sensor.self_test_is_ok().await.is_err() {
error!("CO2 sensor self test failed");
return;
}
if sensor.start_periodic_measurement().await.is_err() {
error!("CO2 sensor measurement initialization error");
return;
}
info!("CO2 task running");
loop {
Delay.delay_ms(INTERVAL_MS).await;
let measurement = sensor.measurement().await.unwrap();
info!(
"CO2: {0}, Temperature: {1} °C, Humidity: {2} RH",
measurement.co2,
measurement.temperature,
measurement.humidity
);
}
}Every five seconds the task reads the measurement from the sensor. It then prints the CO2 concentration level to our debug console together with the humidity and temperature:
> cargo run
    Finished `dev` profile [unoptimized + debuginfo] target(s) in 0.04s
     Running `probe-rs run --chip nRF52833_xxAA --log-format '{t} {L} {s}' target/thumbv7em-none-eabihf/debug/rusty-sensor`
      Erasing ✔ 100% [####################] 112.00 KiB @  39.47 KiB/s (took 3s)
  Programming ✔ 100% [####################] 112.00 KiB @  40.04 KiB/s (took 3s)                                                                                                      Finished in 5.74s
0.000000 INFO  Starting...
0.000061 INFO  Temp task is running
0.000396 INFO  Chip temperature: 21 C
2.003387 INFO  CO2 sensor serial number: 0x3002E3073B34
5.000823 INFO  Chip temperature: 21 C
10.001281 INFO  Chip temperature: 21 C
12.006744 INFO  CO2 task running
15.001739 INFO  Chip temperature: 21 C
17.010040 INFO  CO2: 615, Temperature: 24.375145 °C, Humidity: 39.39422 RH
20.002197 INFO  Chip temperature: 21 C
22.013702 INFO  CO2: 600, Temperature: 24.070724 °C, Humidity: 39.862667 RH
25.002685 INFO  Chip temperature: 21 C
Mission accomplished!
Learning from the expert
With the first version of the code in place, it is time to have a look at Rusty Bits' moxi project. Interestingly we have chosen different crates for the sensor driver. I have chosen the scd4x crate, while he has picked the libscd crate. The libscd crate has fewer dependencies than the scd4x crate, but besides that I don't see any reason to choose one over the other and will continue using the scd4x crate.
The CO2 task in the moxi project is separated into its own module. Structuring my project better is definitely something I am going to do before adding more functionality, right now it has the structure of a Hello World implementation.
I found an interesting comment in his sense.rs file that explains an issue I've
been seeing: sometimes the sensor does not respond to the request for its serial
number. The output it generates looks like this:
cargo run
Finished `dev` profile [unoptimized + debuginfo] target(s) in 0.12s
Running `probe-rs run --chip nRF52833_xxAA --log-format '{t} {L} {s}' target/thumbv7em-none-eabihf/debug/rusty-sensor`
Erasing ✔ 100% [####################] 112.00 KiB @ 39.60 KiB/s (took 3s) Finished in 5.73s
0.000000 INFO Starting...
0.000061 INFO Temp task is running
0.000396 INFO Chip temperature: 22 C
2.000976 INFO Waiting for CO2 sensor
5.000823 INFO Chip temperature: 22 C
6.001953 INFO Waiting for CO2 sensorMy first thought was that this is just a bad wire issue, which happens when things are hooked up on a breadboard. Reading through Rusty Bits' code and seeing the comment I now understand the reason why this happens, and it is not bad wiring.
The microcontroller resets every time it is programmed, but the sensor does not. If the sensor is already in periodic measurement mode from a previous run, it won't respond to the initialization commands. To fix this, I need to make sure the sensor is not running in periodic measurement mode before initializing.
@@ -66,11 +66,13 @@ async fn co2_task(bus: &'static Mutex<ThreadModeRawMutex, Twim<'static>>) {
     let i2c_dev = I2cDevice::new(bus);
     let mut sensor = Scd4xAsync::new(i2c_dev, Delay);

+    _ = sensor.stop_periodic_measurement().await;
+
With this change in place the issue is resolved and the sensor responds as expected after every reprogramming.
Thank you for reading.